A stitcher sits at the kitchen table with a daisy half done. The petals look good. She brings the needle up for the center, wraps the floss twice, pushes down, and pulls. The knot wobbles and slides through to the back of the linen. On the front there is only a tiny hole where a knot should be.
That vanishing knot has one usual cause, and it is not clumsy hands. The needle went back down the same hole it came up through. Move it over by a thread or two and the knot has something to sit on. The rest of this guide covers the other causes and the right number of wraps. It also shows how to make a whole row of knots that match.
How to stitch a French knot that holds
Six-strand floss is sold as one thick thread made of six thin ones. Cut a length about 18 inches long (45 cm), then pull out two single strands and put them back together. That pair is what you thread. Two strands and two wraps give a knot about 2 mm across, just under 1/8 inch, which is the size most designs expect.
- Hoop the fabric and tighten the screw until the surface sounds like a drum when you tap it.
- Knot the end of the floss and bring the needle up from the back at the exact spot where the knot belongs. Pull all the floss through.
- Hold the floss with your other hand about 1 inch from the fabric. Lay the needle across it, pointing away from you.
- Wrap the floss around the needle twice, close to the tip. Keep the wraps snug but not tight enough to bite into the needle.
 Save
SaveFloss wrapped twice around the needle just above the fabric for a French knot - Keep holding the floss tail. Turn the needle upright and put the tip into the fabric one or two fabric threads away from where you came up, about 1 mm over.
- Slide the wraps down the needle until they sit on the fabric, still with a light pull on the tail.
- Push the needle through to the back and pull slowly. Let go of the tail only in the last inch, as the knot closes.
Practice five knots on the scrap before the real piece. The first two usually look odd. By the fifth, your hands know where the tension belongs.
Why knots slip through to the back
Most disappearing knots come down to four habits. Check them in this order, because the first one fixes the majority.
Same hole in and out. When the needle returns through the hole it came up through, the wraps have nothing under them. They follow the needle straight through. One fabric thread of space is enough to stop it. On tightly woven quilting cotton that gap is so small you can barely see it.
Letting go of the tail too early. Wraps stay tight only while something pulls on them. Let go of the floss while the needle is still halfway through, and the wraps loosen and slide off the tip. Then the knot either vanishes or turns into a loose loop.
Slack fabric. A loose hoop lets each hole stretch wider as the needle passes. So even a correct knot can squeeze through. Re-tighten the hoop every half hour. Linen relaxes faster than cotton.
Open weaves. Loosely woven linen and evenweave (fabric woven with even, countable threads) have holes big enough to swallow a two-strand knot. Leave two fabric threads between entry and exit instead of one, or add a strand.
If knots survive but the fabric around them ripples, the problem is tension on the whole piece. The puckering guide walks through that fix.
One wrap, two wraps, or more?
Two wraps is the dependable default. One wrap makes a flat little dot, good for eyes and tiny seeds. Three wraps can work, but the knot starts to stand tall and may tip sideways as the thread settles.
Want a bigger knot? Add strands and keep the wraps at two. A two-wrap knot in four strands is round and full. A four-wrap knot in two strands looks like a coiled spring lying on its side, and it snags. That is the mistake most beginners make, and it is why their big knots look messy.
 Save
SaveHere is a simple size chart, all with two wraps. One strand gives a knot about 1 mm wide. Two strands give about 2 mm. Four strands reach about 3 mm, and six strands land near 4 mm, a little over 1/8 inch. Past six strands, switch to size 5 pearl cotton, a single twisted thread that makes a smooth knot and never splits.
Matching knots every time
But knots can still come out uneven from small changes you don’t notice. One knot gets a firmer pull on the tail. The next gets the wraps pushed higher up the needle. Keep those two things the same and the knots match.
Needle choice matters more than most tutorials admit. A milliner’s needle has an eye no wider than its shaft. So the wraps slide off smoothly instead of catching on a bulge. Crewel needles work, but the wraps can bunch at the eye and make some knots lumpy.
Stitch a practice row of ten knots on the scrap. Look at them from arm’s length. If three in a row match, start on the real piece and keep the same rhythm.
Filling a shape with knots
Packed knots make a nubbly, raised texture that no flat stitch can copy. Sunflower centers and berries are the usual candidates. Start at the outside edge of the shape and work inward in a spiral. Set each knot about 1 mm from its neighbor, close enough that no fabric shows once the area is done.
 Save
SaveMixing two close shades in the same fill adds depth. Use a dark brown on the outer ring and a golden brown in the middle, for example. And keep every knot at the same strand count. A single fat knot in a tidy fill stands out more than a gap.
Budget time for it. A circle 1 inch across takes around 120 knots. At about 20 seconds each, that is 40 minutes for one sunflower center.
Where French knots earn their place
Knots are the stitch for anything round and small. Flower centers and dandelion clocks are the classic uses. So are the eyes on a stitched bee and the tiny buds on a lavender sprig.
 Save
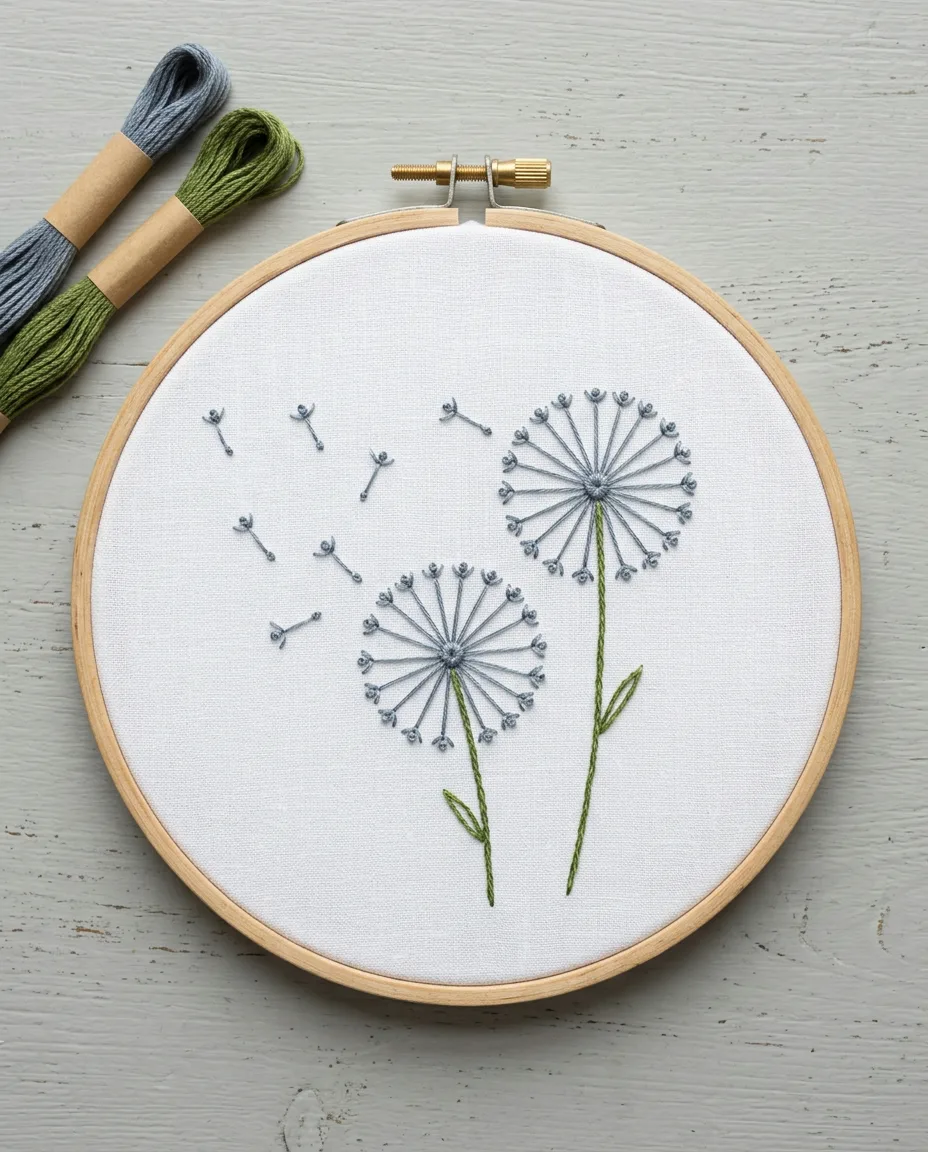
SaveFor a dandelion seed head, stitch 12 to 16 thin straight stitches radiating from one center point, each about 8 mm long (a little over 1/4 inch). Then put a one-wrap knot in one strand at the outer tip of each line. The result looks light and airy, which is the point.
On clothes, keep knots small and stitch them last. Big knots catch on zippers and jewelry. Never carry the floss more than 1/2 inch across the back between knots. Tie off and start fresh, or the carried thread shows through pale fabric and can pull the knots loose over time.
Safety note for families: keep loose needles and cut thread tails away from small children while you work, and count needles back into the case at the end.
Finishing a knotted piece
Knots crush easily when the finished piece gets pressed. Lay the work face down on a folded towel and press from the back with a medium iron. The towel lets the knots sink in instead of flattening. Remove any water-soluble pen marks with a cold rinse before you iron, since heat can set some of them.
Nothing is lost if a knot works loose later. Take a single strand of matching floss and make a tiny stitch over the base of the knot from behind. It will not show from the front.